Exchange Data
This topic describes how to develop a Legato app to exchange data with AirVantage:
- Send data (e.g., sensor values) from a Legato app to AirVantage
- Send commands (or apply settings) from AirVantage to a Legato app
Data is transmitted over the standardized OMA LightWeight M2M protocol secured with DTLS. The underlying protocol and security stacks are provided by Legato so developers can focus on gathering data from sensors without worrying about security.
These are the main steps to develop a Legato app that exchanges data with AirVantage:
1. Define data model on your target device.
2. Develop and Install Legato app.
3. Create Packages, Upload, and Run AirVantage.
4. Exchange data between the target device and AirVantage.
Prerequisite
We recommend you work through the MangOH Getting Started before starting this tutorial. Part references used in this tutorial:
If you encounter issues setting up your target device, go to our developer community.
Define App Data
This section covers how to define an app data model and configure variables, settings, and commands.
First, define a scenario to implement and the data to be exchanged. This will guide you through the code to manage the app data life cycle.
One Room Scenario
This sample shows how to use AirVantage to automate remote monitoring and control of scenario for simple room temperature:
In this model, one Room has 3 variables that can be read (no write access) by AirVantage:
- Room name
- Current temperature
- Current AC switch (on/off) state The Room has a target temperature that can be set (read and write access) by AirVantage. User can remotely set the room temperature.
The Room also has an AC switch can be triggered from AirVantage.
In this remote control case, the user can turn on the AC by defining a target temperature setting; the AC can be turned off using this command.
The variables, settings and commands are gathered in an app data named Room. Here's a code sample:
assets:{Room ={variables:{string Namefloat Temperaturebool IsAC_on}settings:{int TargetTemperature}commands:{TurnOffAC}}}
Two Room Scenario
This sample shows how to monitor two rooms (a living room and a bedroom).
We need to create 2 instances of the Room data model, and for each instance:
- assign a name to the room, in the field
Name. - set the current temperature of the room to variable
TemperatureC. - reflect the on/off state of the AC to variable
IsAC_on. - if the user remotely changes the target temperature
TargetTemperatureCon AirVantage, then the AC will automatically be switched on. - user has the ability to remotely switch off the AC on AirVantage, by sending the
TurnOffAccommand.
Implement Legato App
This section covers how to:
- get Legato Sample Source Code from GitHub
- Use Legato APIs.
- Declare variables.
- Initialize App.
- Compile and Install Legato app for MangOH/WP85xx
Sample Source Code
Download the sample app source code from GitHub.
The Room data model, defined previously, is declared in Component.cdef file.
Before data exchange can start with AirVantage, a LWM2M session must be established. Usually, this session is initiated by another app (e.g., a controller app managing connectivity).
The AirVantage Connector API (le_avdata.api) and AirVantage Data API (le_avc.api) are used to exchange data and to create LWM2M session.
Use Legato APIs
This section provides code samples using Legato's AirVantage APIs.
In the component definition file component.cdef:
requires:{api:{le_avdata.apile_avc.api}}
In the app definition file, assetDataTutorial.adef:
bindings:{assetDataTutorial.componentAssetData.le_avdata -> avcService.le_avdataassetDataTutorial.componentAssetData.le_avc -> avcService.le_avc}
In the Makefile, include the path to AirVantage APIs:
mkapp -v -t $@ \-i $(LEGATO_ROOT)/interfaces/airVantage \assetDataTutorial.adef
The main code handling the app data exchange with AirVantage is in assetDataMain.c
Declare Variables
Let's declare the following as global:
le_avdata_AssetInstanceRef_t AssetInstRef[2]; // Reference to the 2 asset instances.char* RoomName[2]; // Array of 2 Variable Name.float CurrentTemperature[2]; // Array of 2 Variable Temperature.bool IsAcOn[2]; // Array of 2 Variable IsAC_on.int TargetTemperature[2]; // Array of 2 Setting TargetTemperature.int OutsideTemperature = 30; // Assuming hot summer.le_timer_Ref_t TempUpdateTimerRef = NULL; // Reference to temperature update timer.le_timer_Ref_t AvcTimerRef; // Reference to the AVC session timer.le_avc_StatusEventHandlerRef_t AvcEventHandlerRef = NULL; // Reference to AirVantage Controller// (AVC) Session handler.
Initialize App
The COMPONENT_INIT is called once by the Legato framework when the app starts. This is where your component's initialization code goes.
COMPONENT_INIT must return to the framework. App logic tasks are implemented outside of this function using event-handlers: an event-driven model app.
COMPONENT_INIT
We'll do the following initializations in COMPONENT_INIT:
Register an AirVantage Controller (AVC) handler function, by calling le_avc_AddStatusEventHandler() function. Only a registered control app can call le_avc_StartSession().
Call le_avc_StartSession() to start an AVC Session with AirVantage.
// Register a AVC handler.AvcEventHandlerRef = le_avc_AddStatusEventHandler(AVsessionHandler, NULL);// Start AVC session. Note: AVC handler must be registered prior starting a session.le_result_t result = le_avc_StartSession();if (result == LE_FAULT){}
Create a timer to close the AVC session and exit app, in 10 min:
// Create and start a timer that will time out in 10 minutes and never repeat.le_clk_Time_t delay = { 600, 0 };AvcTimerRef = le_timer_Create("assetDataAppSessionTimer");le_timer_SetInterval(AvcTimerRef, delay);le_timer_SetRepeat(AvcTimerRef, 1);le_timer_SetHandler(AvcTimerRef, TimerExpiredHandler);le_timer_Start(AvcTimerRef);
Create 2 instances of Room Asset, by calling le_avdata_Create()
// Create instances 1 and 2 of asset "Room".AssetInstRef[0] = le_avdata_Create("Room");AssetInstRef[1] = le_avdata_Create("Room");
Assign default values to our 2 instances of Room asset (declared as global variables):
int i = 0;// Assign default value to asset data fields.RoomName[i] = (char) malloc(16);strcpy(roomName[i], "bedroom");CurrentTemperature[i] = 31.0;IsAcOn[i] = false;TargetTemperature[i] = 19;i++;RoomName[i] = (char *) malloc(16);strcpy(roomName[i], "living-room");CurrentTemperature[i] = 30.0;IsAcOn[i] = false;TargetTemperature[i] = 19;
Map data value to instances:
for (i=0; i< 2; i++){le_avdata_SetString(AssetInstRef[i], "Name", RoomName[i]);le_avdata_SetInt(AssetInstRef[i], "Temperature", CurrentTemperature[i]);le_avdata_SetBool(AssetInstRef[i], "IsAC_on", IsAcOn[i]);le_avdata_SetInt(AssetInstRef[i], "TargetTemperature", TargetTemperature[i]);}
Register handler, in order to apply Settings and Commands sent by AirVantage. For each data field (settings and commands), call le_avdata_AddFieldEventHandler() to register handler functions that will be called by the framework whenever the field is altered by AirVantage:
for (i = 0; i < 2; i++){// call OnWriteSetting() handler whenever the setting "TargetTemperature" is accessedle_avdata_AddFieldEventHandler(AssetInstRef[i], "TargetTemperature", OnWriteSetting, NULL);// call OnCommand() handler whenever the setting "TurnOffAC" is accessedle_avdata_AddFieldEventHandler(AssetInstRef[i], "TurnOffAC", OnCommand, NULL);}
Simulate the rooms' temperature, let's set a timer to update the temperature every 5 seconds:
// Create timer, with an interval of every 5 seconds, repeating forever.le_clk_Time_t interval = { 5, 0 };TempUpdateTimerRef = le_timer_Create("tempUpdateTimer");le_timer_SetInterval(TempUpdateTimerRef, interval);le_timer_SetRepeat(TempUpdateTimerRef, 0);le_timer_SetHandler(TempUpdateTimerRef, UpdateTemperature);le_timer_Start(TempUpdateTimerRef);
Set Handler Functions
Our app needs to implement handler functions to retrieve the value of a Setting (TargetTemperature) set by AirVantage. This function should have the prototype defined by le_avdata_FieldHandlerFunc_t, see Manage AirVantage Data.
This function must be registered in COMPONENT_INIT with le_avdata_AddFieldEventHandler().
Let's name it OnWriteVariable:
- void OnWriteVariable(le_avdata_AssetInstanceRef_t instRef, const char *fieldName, void *contextPtr)
- This function will be called by the framework whenever AirVantage wants to change the
fieldname. Setting of our asset instance, referenced byinstRef - To retrieve the Setting value pushed by AirVantage, call le_avdata_GetString(), le_avdata_GetInt or le_avdata_GetBool()
void OnWriteSetting(le_avdata_AssetInstanceRef_t() instRef, const char* fieldName, void* contextPtr){int i;for (i = 0; i < 2; i++){if (instRef == AssetInstRef[i]){if (strcmp(fieldName, "TargetTemperature") == 0){// Get the new setting from AirVantage.int nTemp;le_avdata_GetInt(instRef, fieldName, &nTemp);if (nTemp != TargetTemperature[i]){// Let's set the AC status to ON, and update the object with our new values.IsAcOn[i] = true;TargetTemperature[i] = nTemp;le_avdata_SetBool(instRef, "IsAC_on", IsAcOn[i]);le_avdata_SetInt(instRef, fieldName, TargetTemperature[i]);}}break;}}}
Command Handler Functions
Our app needs to implement handler function to Execute the Command (TurnOffAC) set by AirVantage. This function should have the prototype defined by le_avdata_FieldHandlerFunc_t. This function must be registered in COMPONENT_INIT with le_avdata_AddFieldEventHandler.
Let's name it OnCommand:
- void OnCommand(le_avdata_AssetInstanceRef_t instRef, const char *fieldName, void *contextPtr)
- This function will be called by the framework whenever AirVantage wants to execute the
TurnOffACCommand on our asset instance, referenced byinstRef
{int i;for (i = 0; i < 2; i++){if (instRef == AssetInstRef[i]){if (strcmp(fieldName, "TurnOffAC") == 0){// Execute the command, just turn AC status to OFF, and reflect the new value to the// instance.IsAcOn[i] = false;le_avdata_SetBool(instRef, "IsAC_on", IsAcOn[i]);}break;}}}
Simulate Temperature
The handler updateTemperature is called by the framework every 5 seconds, as set in COMPONENT_INIT. This is how the function modifies the temperature:
- if AC switch is OFF, then converge the room temperature to the outside temperature
- if AC switch is ON, then converge the room temperature to the
targetTemperature(set in AirVantage). Simulated room temperatures are then pushed to AirVantage by calling le_avdata_SetFloat(). This is performed automatically by the underlying LWM2M Observe feature when AVC session is opened.
AVC Handler Functions
The AVsessionHandler function has been registered in the COMPONENT_INIT function; this is required to start an AVC session with AirVantage. For this tutorial, let's do nothing in this function.
Exit App
The handler timerExpiredHandler is called by the framework 10min later, as set in COMPONENT_INIT. This function closes LWM2M session and Quit the app
Compile and Install
Next, you have to compile your app and install it on the target device.
Compile the source code from assetDataTutorial main folder and install the app on the target device.
Our example uses a mangOH board with an embedded WP8548 module so the compiler target will be wp85. If you're using a different target module, change the compiler target as needed (e.g., ar7, wp7 or ar86).
Enter these 2 commands on the Host PC:
make wp85
After make completes, a software package will be generated: assetDataTutorial.wp85.update
update <software package> <device_ip_address>
Upload and Run AirVantage
Now, we'll upload our app and data model to AirVantage. The Room data model in Component.cdef is defined in a manifest file (XML file generated automatically at compile time). The manifest file exposes the app data collection of information to AirVantage. AirVantage needs the manifest information to access the Room data model so it can exchange the predefined data with our device app.
This section covers how to:
- Create an app update package for a target device and generate app package to upload to AirVantage.
- Upload app package to AirVantage
- Assign app to our device on AirVantage.
- Launch App and View Log.
Create and Generate AirVantage Package
This step is run on the Host, in Terminal #1:
av-pack -f assetDataTutorial.wp85.update <TypeName>
where <TypeName> shall be globally unique (e.g. assetTutorialAppV3), AirVantage uses it to uniquely identify multiple versions of our app
Login and Upload
- Login to the AirVantage portal.
- Choose the "Develop" activity, and then
MyApps. - Click the Release button.
- Select the app package zip file
assetDataTutorial.zip, created in the previous section. - Check the "I want to publish my app after releasing it" checkbox in the
Advancedsettings option. - Click Start.
Assign App to Device
Before our device can exchange "Room" data fields with AirVantage, the uploaded app must be assigned to our device on AirVantage.
Depending on your AirVantage account setup, there are two alternatives to assign the app.
If you're using AirVantage for one device type:
- Login to AirVantage portal, go to
Inventoryactivity, and thenSystems. - Select your system by clicking on its Name.
- Click on the Edit icon.
- In the
Applicationsfield, type in the name of the app (e.g., assetDataTutorial) and select it. - Click Save.
If you're using one AirVantage account to monitor multiple SIM cards and devices:
- Login to the AirVantage portal, go to
Monitoractivity, andSystems. - Choose the More menu, and then the Edit icon.
- In the
Applicationsfield, type in the name of the app (e.g., assetDataTutorial) and select it. - Click Save.
You can now use your saved package to install your app remotely using AirVantage.
So far, we created an app that can exchange a collection of information (app data fields) with AirVantage, packaged the app with a manifest file,and then uploaded it to AirVantage.
Next, we need to retrieve the current values:
- room name
- current temperature
- target temperature
- AC switch state for bedroom and living room on AirVantage.
This is how your target terminal will look:
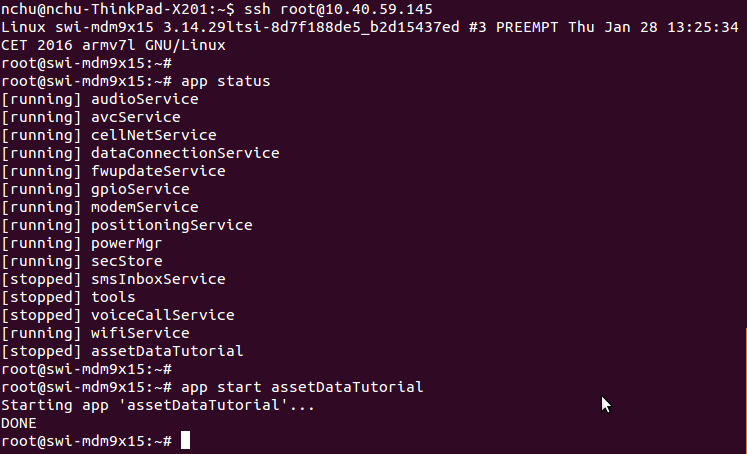
Launch App and View Log
We're now ready to start data exchange with AirVantage. Start the app and prepare to view the log:
In the Terminal #2:
- Connect to the target using ssh: ssh root.
- Launch
logread -f | grep "Legato AssetData"to continuously view the log In the Terminal #3. - Connect to the target using ssh: ssh root.
- Type in
app statuscommand to make sure thatassetDataTutorialis listed. - Launch the app:
app start assetDataTutorial.
This is how your Terminal #2 (using logread -f) will look:

Exchange Data with AirVantage
The LightWeight M2M protocol default behavior initiates communication to the server through the target device. Once a connection between the server and the device is established, the server can send any request to the device: read or write a data, execute a command, apply a firmware upgrade, install an app, etc.
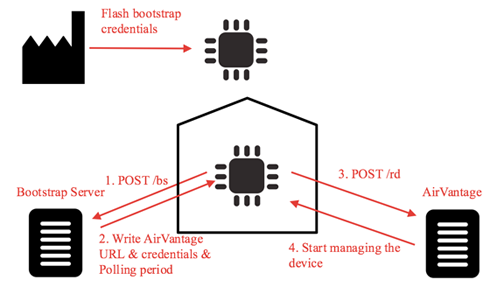
When a device is in the field:
- On the first boot, it starts to communicate with the bootstrap server to collect credentials and the AirVantage URL. It will do this only if AirVantage denies the connection or because of a regular interval to change the security keys (steps 1 and 2).
- Then the device initiates a communication with AirVantage, updates the objects list (step 3).
- AirVantage sends the pending requests to the device (step 4).
- The device executes the requests.
- The device communicates the acknowledgements and close the connection.
Push Data
If you need to collect data as soon as the device is ready to communicate with AirVantage, and at high frequency, use the AirVantage LWM2M Observe feature.
This is how the Observe feature sends new data values:
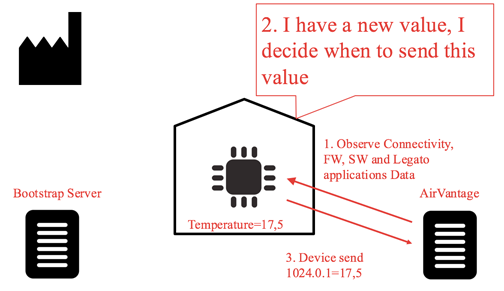
- On the first communication with a device, AirVantage will request to observe a list of data (step 1). This sends a notification when new values exist for this list of pre-defined data.
- When a new value is obtained from the sensor, the value is pushed to Legato (step 2).
- The target device sends the data automatically without a new request from AirVantage (step 3).
During sample app data updates in Legato, you can see the new values displayed in AirVantage using the timeline view.
If you're using a Sierra Wireless SIM card, you can Test Your Solution and Monitor Your System
Copyright (C) Sierra Wireless Inc. Use of this work is subject to license.